Scanning
The Scanner interface allows the user to sweep parameters over a certain range of values, and execute for each of them a custom recipe.
Scanning panel
Scan configuration
A scan can be composed of several recipes. Click on Add recipe at the bottom of the scanner to add an extra recipe.
A recipe represents a list of steps that are executed for each value of one or multiple parameters.
Parameters
The first step to do is to configure a scan parameter. A parameter is a Variable which is writable (write function provided in the driver) and numerical (integer or float value). To set a Variable as scan parameter, right click on it on the control panel window, and select Set as scan parameter.
The user can change the name of the parameter using the line edit widget. This name will be used in the data files. It is possible to add extra parameters to a recipe by right-clicking on the top of a recipe and selecting Add Parameter This feature allows to realize 2D scan or ND-scan. A parameter can be removed by right-clicking on its frame and selecting Remove <parameter>. A parameter is optional, a recipe is executed once if no parameter is given.
Parameter range
The second step is to configure the range of the values that will be applied to the parameter during the scan. The user can set the start value, the end value, the mean value, the range width, the number of points of the scan or the step between two values. The user can also space the points following a logarithmic scale by selecting the Log option. It is also possible to use a custom array for the parameter using the Custom option.
Steps
The third step is to configure recipe steps, that will be executed for each value of parameters. There are four kinds of recipe steps:
Measure the value of a Variable. Right click on the desired Variable in the control panel and select Measure in scan recipe to append this step to the recipe.
Set the value of a Variable. Right click on the desired Variable in the control panel and select Set value in scan recipe to append this step to the recipe. The variable must be numerical (integer, float or boolean value). To set the value, right click on the recipe step and click Set value. The user can also directly double click on the value to change it.
Execute an Action. Right click on the desired Action in the control panel and select Do in scan recipe to append this step to the recipe.
Each recipe step must have a unique name. To change the name of a recipe step, right click on it and select Rename, or directly double click on the name to change it. This name will be used in the data files.
Recipe steps can be dragged and dropped to modify their relative order inside a recipe, to move them between multiple recipes, or to add them from the control panel. They can also be removed from the recipe using the right click menu Remove.
Right-clicking on a recipe gives several options: Disable, Rename, Remove, Add Parameter, Move up and Move down.
All changes made to the scan configuration are kept in a history, allowing changes to be undone or restored using the Undo and Redo buttons. These buttons are accessible using the Edit button in the menu bar of the scanner window.
Store the configuration
Once the configuration of a scan is finished, the user can save it locally in a file for future use by opening the Configuration menu and selecting Export current configuration. The user will be prompted for a file path in which the current scan configuration (parameter, parameter range, recipe) will be saved.
To load a previously exported scan configuration, open the menu Configuration and select Import configuration. The user will be prompted for the path of the configuration file. Use the Append option to append the selected configuration as an extra recipe to the existing scan. Alternatively, recently opened configuration files can be accessed via the Import recent configuration menu.
Scan execution
Start button: start the scan.
Pause button: pause / resume the scan.
Stop button: stop the scan.
Continuous scan check box: if checked, start automatically a new scan when the previous one is finished. The state of this check box can be changed at any time.
Note
The scan configuration cannot be modified or loaded when a scan is started. Stop it first.
Note
During a scan, the background color of each item (parameter or recipe step) indicates its current state. An orange item is being processed, a green one is finished.
Figure
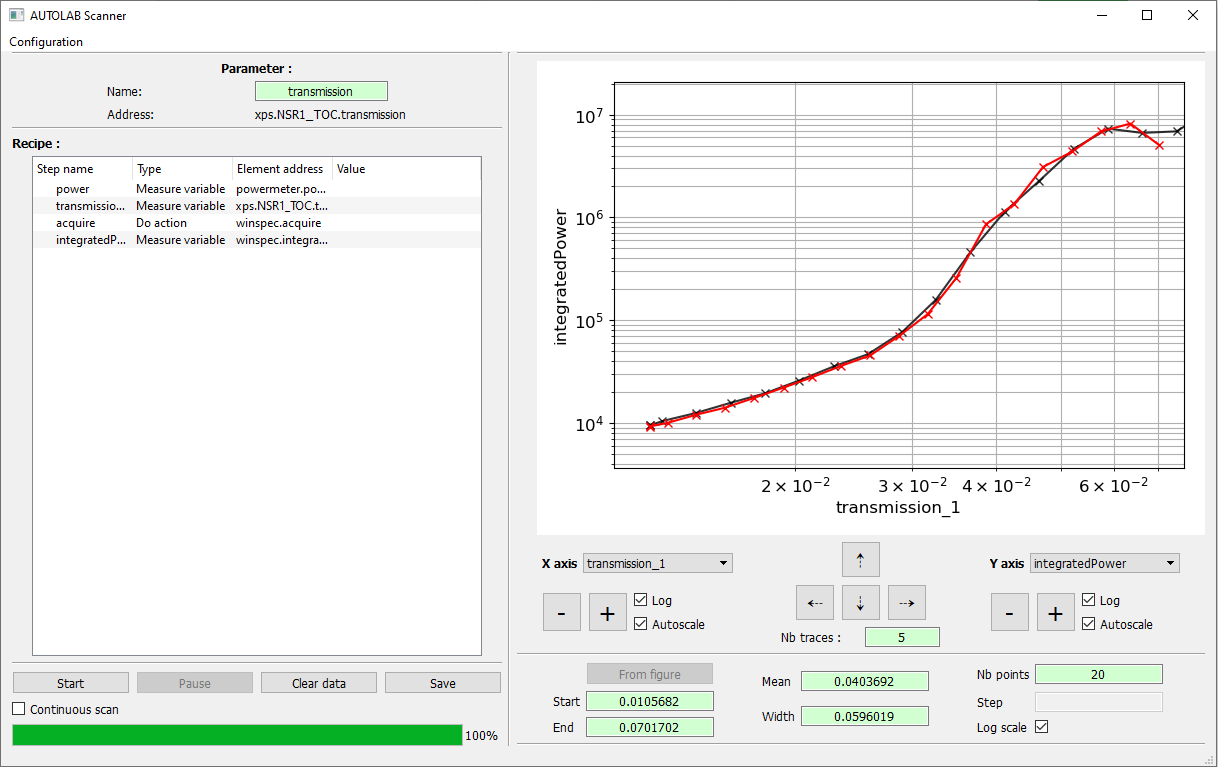
The user can interact with the figure at any time (during a scan or not).
After the first loop of a recipe has been processed, the user can select the Variable displayed in x and y axes of the figure.
A data filtering option is available below the figure to select the desired data, allowing for example to plot a slice of a 2D scan.
A 2D plot option allows to display scan data as a colormap with x, y as axies and z as values, usuful to represent ND-scan.
Scan data can be clear or saved with the buttons bellow the figure.
Clear all button: delete any previous datapoint recorded.
Save all button: save all the data of all the executed scans. The user will be prompted for a folder path, that will be used to save the data of all the scans.
Save button: save the data of the selected scan. The user will be prompted for a folder path, that will be used to save the data of the scan.
The user can display the previous scan results using the combobox below the scanner figure containing the scan name (scan1, scan2, …).
If the user has created several recipes in a scan, a combobox below the scanner figure contaning the recipe names (recipe, recipe_1, …) allows to change the displayed recipe results.
A combobox below the scanner figure containing the dataframe name or ‘Scan’ for the main scan result allows to display arrays and images.
The button Scan data display the scan data in a table.
The button Send to plotter send the scan data of the selected recipe to the Plotting.
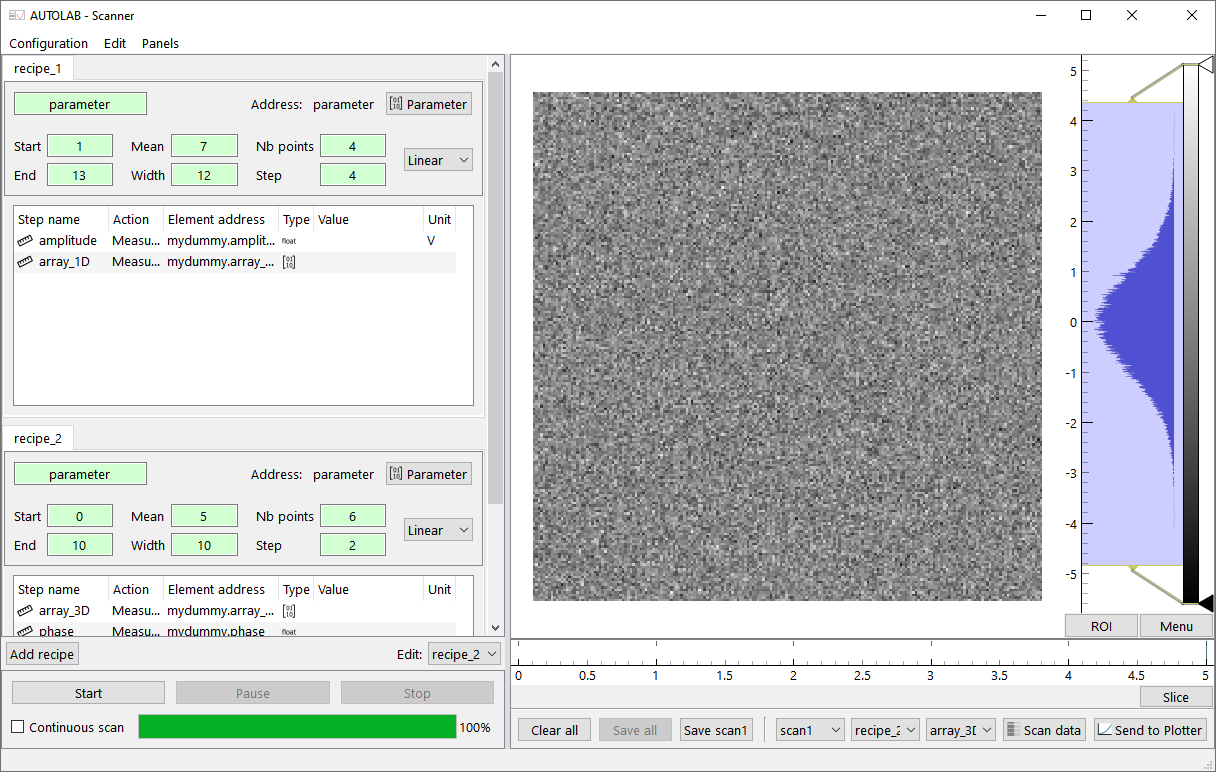
Multiple recipe example